How to Connect DVR via Internet to Watch CCTV Cameras from a Remote Location?
Setting up DVR to be used from remote location:
bookmark this page for future reference
LinkSys Router Setup - Dymanic DNS
D-Link Router Setup - Dymanic DNS
- Connect your DVR to your router
- Use menu on DVR to assign internal IP and gateway and port number.
This Local IP must be in the same Gateway range as the Router. If you are unsure check the Router and locate the Status section, or goto the Command prompt of Windows XP and type in ipconfig.
Look for Gateway. If the Gateway is 192.168.1.1, then you can make the DVR's IP anything from 192.168.1.2 - 192.168.1.255.
Also you will need to use the same SubNet Mask, which is typically 255.255.255.0, and also use the same gateway. - Next find out what port your DVR uses. The easiest way to it is by reading the manual of your DVR. Look for the network section of it.
Also if it comes with network software, check out if in the connection area the software shows the port number.
Also check the Server software/Programming (Network section of it) to see if the port is listed.
In many cases it will be as simple as just Port 80, which is an HTTP port. - Set your router to forward chosen port to internal IP address of DVR.
To access the Router itself, use the Gateway you just located. If the gateway is 192.168.1.1, then enter that into the location edit box of your browser and then click the Enter button. A username and a password are typically required, but it depends on a router. For Linksys use "admin", "admin". By default DLink doesn't require any username or password (It is highly recommended to change the default password).
Once you're logged into the Router, in the Applications & Gaming Section / Servers of the Router, you need to add a Server/Application. Enter the port number and select TCP only. Where it says Port 0 to 0 enter the same port number twice. Or if your DVR uses for example, ports 3550, 4550, 5550, 6550, and there is nothing else utilizing these ports in between, then you can actually just enter one line, 3550 - 6550.
Enter the DVR/Cameras internal IP.
Enable it.Quote:Originally Posted by ExampleIf the port was 1024, and the Local IP is 192.168.1.200, then it would be:
NAME = Anything you want
Port = 1024 TO 1024
TCP/UDP = TCP
LOCAL IP = 192.168.1.200
ENABLED = CHECKED
OR
NAME = Anything you want
Port = 3550 TO 6550
TCP/UDP = TCP
LOCAL IP = 192.168.1.200
ENABLED = CHECKED - Set up additional entries for as many ports the DVR uses, to the same local IP. Check your DVR manual and it's networking section for all additional ports required. Also check the DVR software itself.
If your router has enough free entries, you can seperate them. Use it like DVR_HTTP for the browser port, DVR_AUDIO for the audio port, etc.
If you are going to use VNC to a PC DVR, then you would need to set up port 5900, and perhaps call it VNC_DVR, for example. - You have a static IP so you don't need to use sevices like www.dyndns.org . You just enter your static IP and your router forwards packets to your DVR.
-M S Ali
---------------------------------------------------------------------------------------
Dynamic DNS Service Setup - (No Longer Free)
Unfortunately, the Dynamic DNS service provided by dyndns.com is no longer free, however, the good news is that it only costs $29.99 per year. DynDNS or DDNS is a service that allows you to configure a domain name, such as www.mydvr.com to route to a dynamic IP address, such as those typically provided by cable and DSL internet access providers for Internet access. A dynamic IP address means that your Internet connection is assigned a different IP address each time you connect or logon. It is recommended that you purchase a router/switch that supports DDNS natively and that you connect the router or switch to your cable or DSL modem. There are other providers of free dynamic DNS service, but CCTV Camera Pros recommends Dynamic Network Services, Inc (dyndns.com) because it has been around for a long time and we have tested it thoroughly for our surveillance equipment. Follow these setup instructions to create and configure an account with dyndns.com. NOTE: if your internet connection supports a static IP address, it is not necessary to setup Dynamic DNS. If you are unsure, please contact your internet service provider.
- Go to Dynamic Network Services website at www.dyndns.com and sign up for an account
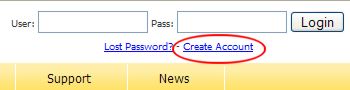
- On the home page click on the Create Account link as seen below:
- Fill on all of the required fields on the sign up page and submit the sign up form.
- The confirmation screen will let you know that an account confirmation email will be sent to you. Wait a few minutes to check your mail.
- When you receive the email, click on the link to confirm opening your account with DynDNS, then login to your account. The confirmation link will being you to a login link. After that, you can login from the dyndns.com home page anytime.
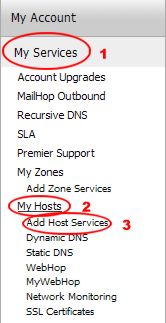
- Once logged into your account, 1) Click on the "My Services" link, 2) then the "My Hosts" link, 3) then the "Add Host Services" link as seen below:
- The New Dynamic DNS Host screen will open. In the hostname field, 1) create a prefix and 2) select a domain name from the dropdown box. The page will automaticall detect your IP address, which you can leave for now. The other fields can be left blank. 3) Click on the "Add Host" button as seen below.
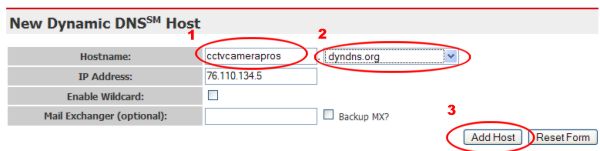
- If successful, a screen will be displayed to let you know that the hostname was created.

LinkSys Router Setup - Dymanic DNS
D-Link Router Setup - Dymanic DNS
-M S Ali

Comments